

Send Twilio SMS in Directus Flow
A step-by-step guide on how to send Twilio SMS from a Directus Flow


Directus is a fantastic tool. I mean truly AMAZING !! And if you reached this article you also know that Flows is an AMAZING component of Directus, though probably still a bit hard to handle.
Let's get right to it, and guide you through the steps of creating a Directus flow that sends Twillio SMS.
Prerequisites
An up-and-running directus server (local or not, does not really matter)
A configured Twilio account with a registered phone number or Alphanumeric Sender ID.
Note about the use case
Please note that this guide is not a real business use case. It aims to give you an idea of how to use flows and get you acquainted with some of their tricks and pitfalls. At times the logic may not seem so reasonable. Please forgive me for that :).
About flow development
A quick note about the process. We need to keep in mind that because of the complexity of the flow components, it is very difficult to just create the flow from start to end and make it work. It required a bit of experimentation and testing as you go along. So it is very recommended to pause after every step and run the trigger to test the results.
This is exactly what I will do in this guide too. So you will know exactly how to do it.
On every section of the guide, there will be a sub-section called "Testing" to see the results of the step.
Now let's start!
Defining the flow logic
First, we need to define what we want to do here.
In this guide, I have a model in Directus that is called "order". I want my flow to send an SMS to some static phone number with some details using Twilio when the order is marked on the status "placed".
The order object data model is:
{
  "id": UUID,
  "product": UUID /* Related product ID */,
  "amount": Number /* Amount of products ordered */,
  "product_price": Number /* Price of a single unit of the product upon order */,
  "order_status": Button Selection,
  "payed": Checkbox,
  "sms_id": String /* We need this information for the flow managment. More on that later*/
}
Get those feet wet!
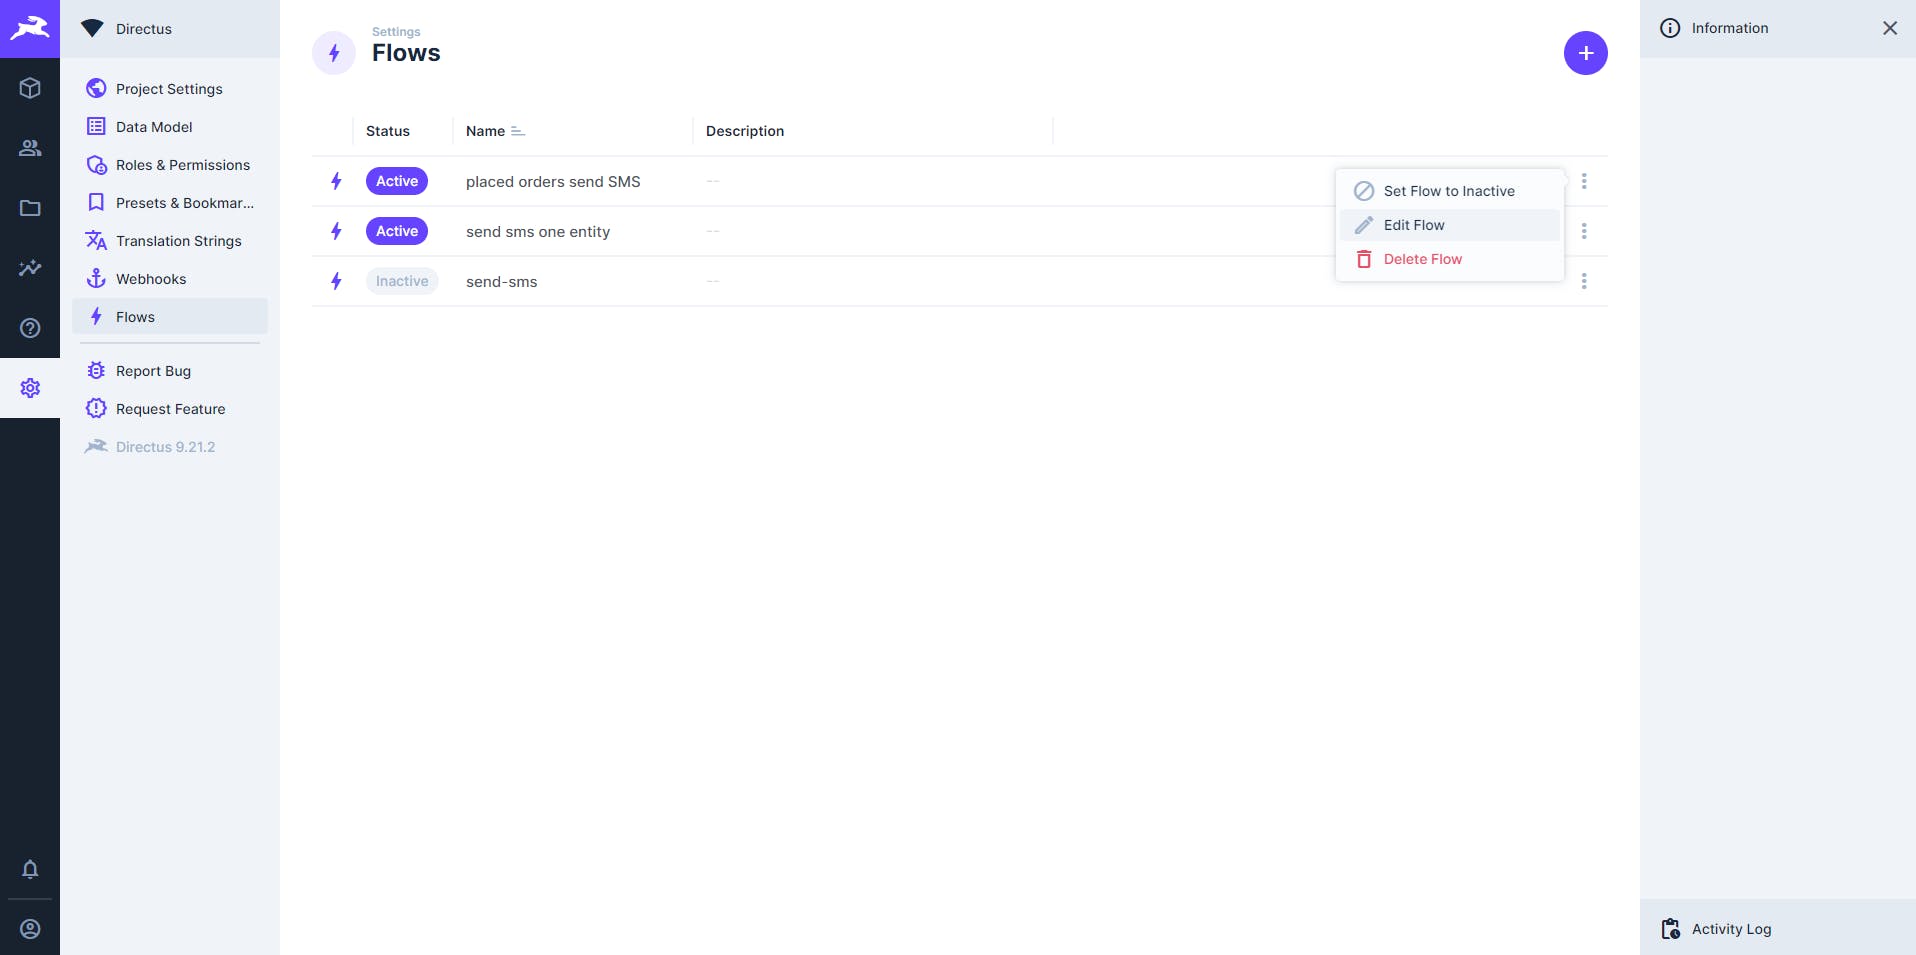
First, log in to your Directus instance and go to Flows menu (located under Settings -> Flows). You will be presented with the current flows table. Now press the ➕ button.
Give the flow a name (you can call it "placed orders send SMS"). Change any other settings you wish, but keep the Activity & Logs Tracking setting as the default one Track Activity & Logs so you can have a better understanding of what is going on in your flow when you develop it. Now move to the Trigger Setup step.
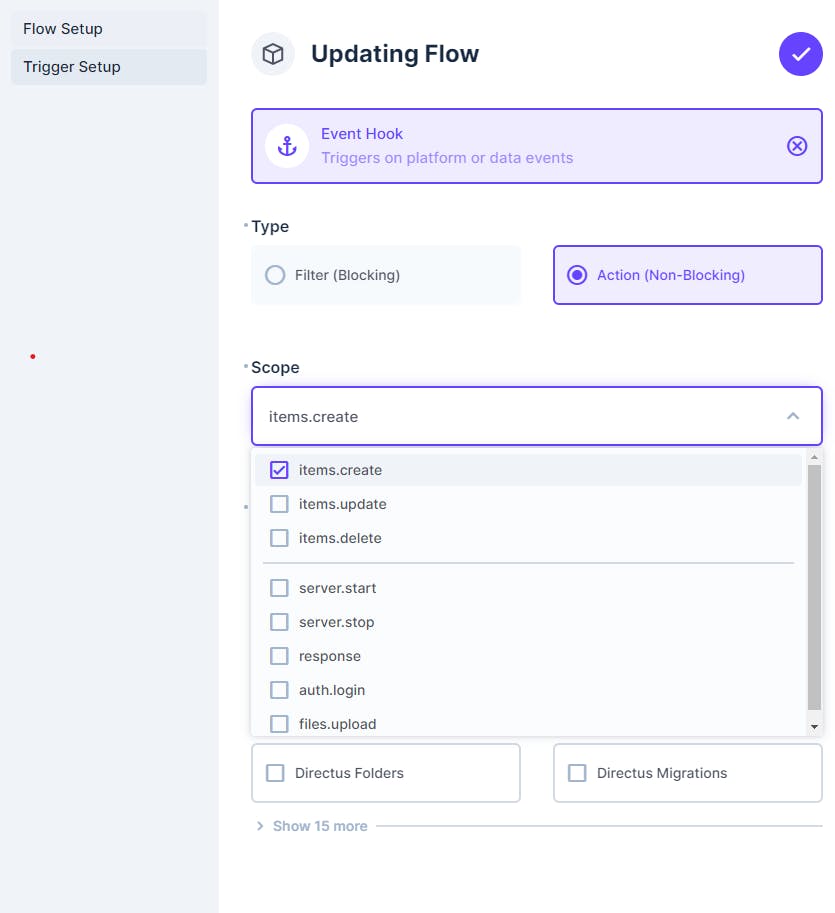
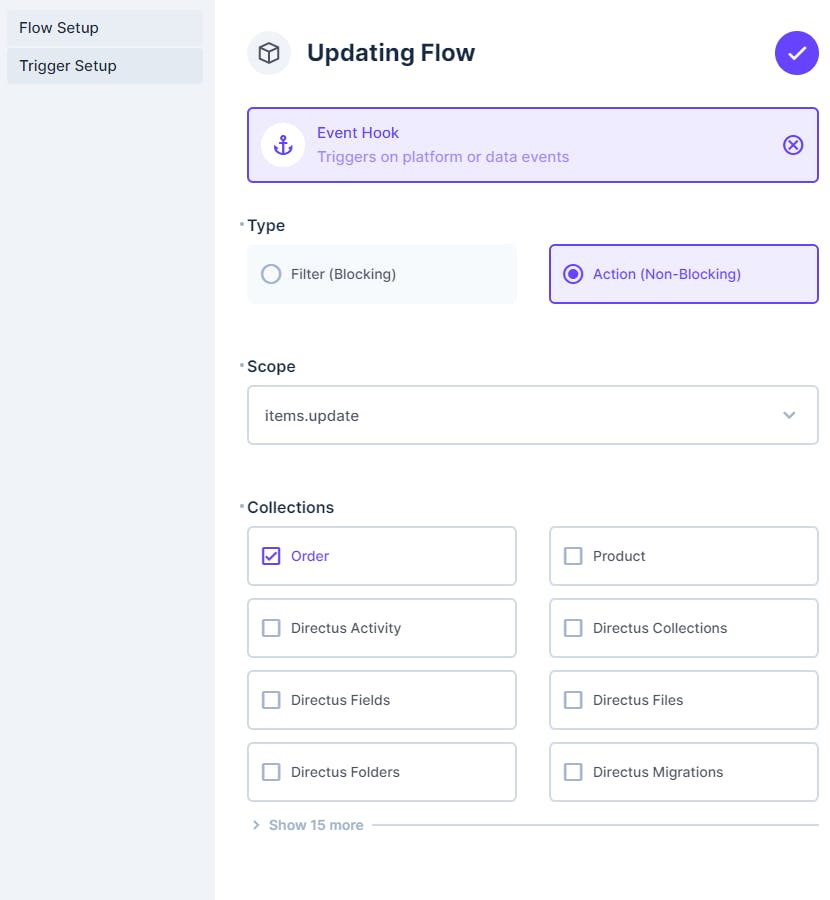
Here we will choose the type Event Hook and an Action (Non-Blocking) type. The Event Hook will trigger your workflow whenever certain events in the system will occur. We want to make sure that upon every order creation or update our flow will trigger. The Action (Non-Blocking) type will make sure that the flow will not block the update/creation of the order object, but will only be triggered as a side-effect. In our case it makes sense because the order should be placed regardless of if the SMS will be sent or not (for example if there is an error in the flow).
At last, let's choose events scopes items.create,items.update and choose our Orders collection.
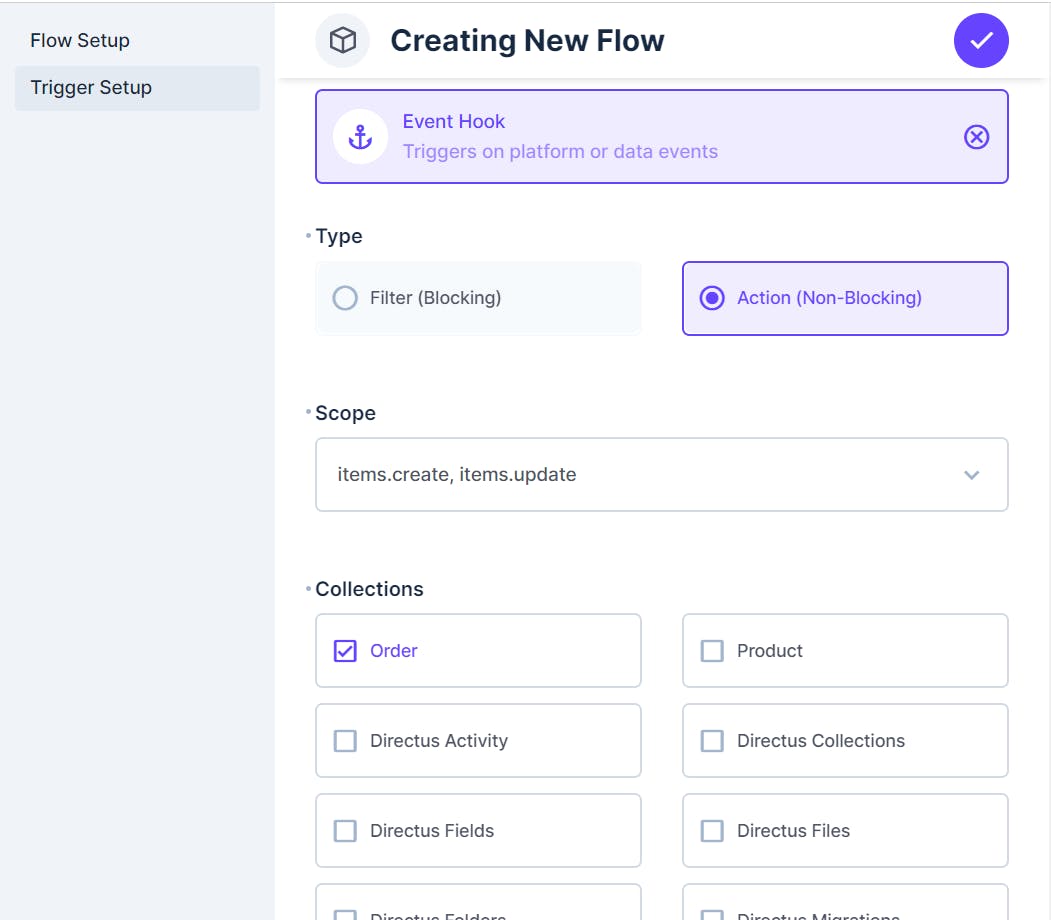
Let's hit the save button and continue.
Trigger testing
To run the flow and test the result we will need to create the event that triggers it. So go ahead and create an Order in the system.
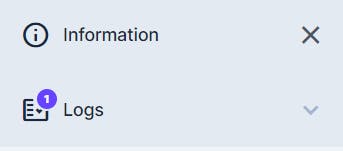
After we create the object we can go back to the flows table, and click on our new flow. Now we can see on the right-hand side section called "Logs" and it's going to have a "1" badge on it, to indicate that logs were collected for one flow run until now.
When we press on the log we can see all the events on the flow (specifically now there will be only one) and under Payload you will see something like this:
{
  "event": "order.items.create",
  "payload": {
    "product": "f6777dc4-98e6-41c4-a812-5a8070ebd2f2",
    "amount": 20,
    "product_price": 20,
    "payed": true
  },
  "key": "f682a9ae-7346-4c2b-8e25-6237476ccde7",
  "collection": "order"
}
So this is the result of the trigger. The payload is the data that this trigger will pass to any consecutive operators in the flow.
Let's update our already created order and see what we will get in the logs of the trigger:
{
  "event": "order.items.update",
  "payload": {
    "order_status": "delivered"
  },
  "keys": [
    "f682a9ae-7346-4c2b-8e25-6237476ccde7"
  ],
  "collection": "order"
}
Two problems arise from these outputs:
On the update trigger, we cannot see the full order object (only the payload of the update). This may cause problems if we need to have some sort of calculation based on multiple fields of the order object.
The format of update and create output are a bit different. In the create output we get only 1 key (and actually even when creating multiple objects in a single API request you will get multiple events like that) and in the update output we get a list of keys.
Those issues leads us to the next step.
Redesigning - The second phase
So we will solve those issues by rethinking our problem. In Directus there is an option of triggering a flow from another flow. We will take advantage of this.
First, we will create 2 separate flows - one for the update operator and one for the create operation. In both, we will manipulate the payload and the result will be a list of keys of entities that need to be fed into the third flow.
The third flow will accept an order object key, will perform the required checks, and will send an SMS if needed.
An empty flow
We will create a very simple flow that will eventually evolve into the flow that actually sends the SMS. For now, it will only accept the entity key and print it to the logs.
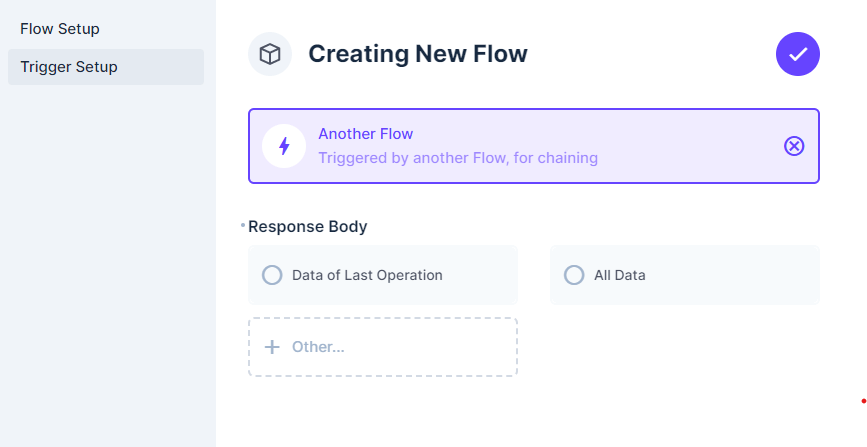
So let's create another flow and call it "send SMS one entity". Now instead of Event Trigger we will choose Another Flow on the trigger type. The response body is not so important because we do not return any value from it. So just choose whatever:
After creating the flow do not add any other operators to it for now.
Create trigger flow
Now let's go back to the flow table and edit our previous flow:
Rename it to "create orders send SMS" and on trigger setup choose only the scope items.create
Now let's click on the flow and edit it.
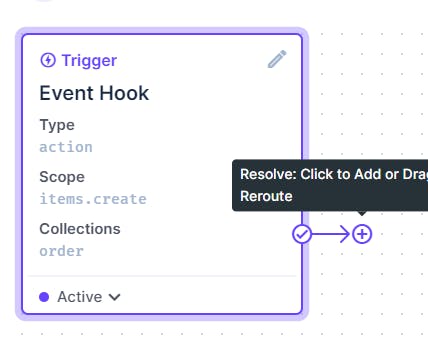
Hover on the ✔️ button next to the trigger and click on the ➕ button to add an operation:
Name it, and choose a trigger flow operation. Choose the flow "send SMS one entity" and in the payload put the value "${{trigger.key}}" :
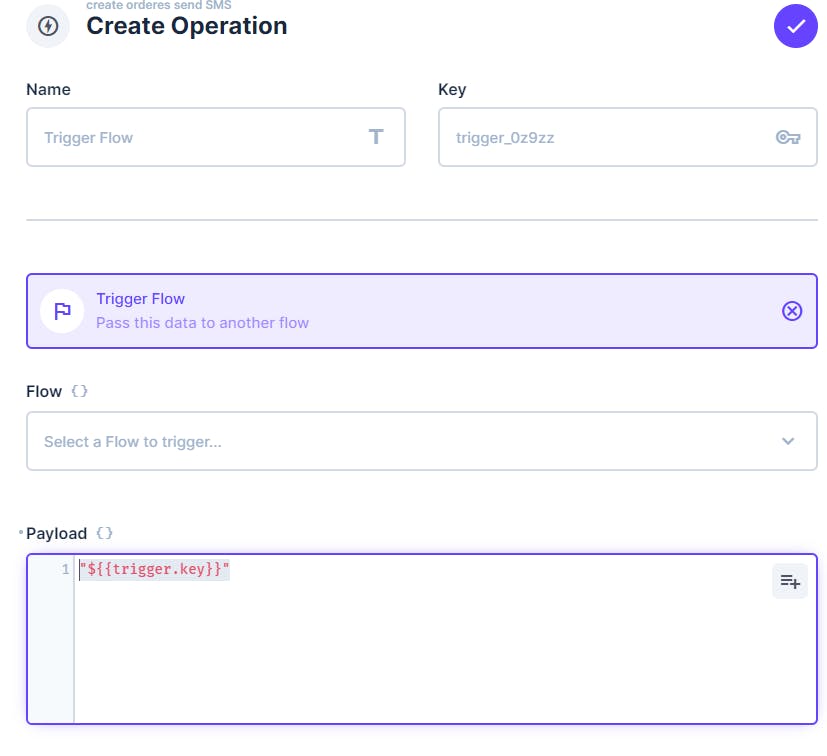
In this way when the flow "send one SMS Flow" will be triggered it will be triggered with the key of the created entity in the payload.
Save the flow.
Update trigger flow
Now we will create the flow that will be triggered when one or more entities are updated. Again create an event hook that is non-blocking and this time choose items.update scope with the order collection.
Now add an operation to trigger a flow just like before. This time we will need to raw edit the payload for the operation press on the {} button right next to the payload and pass the value {{$trigger.keys}}.
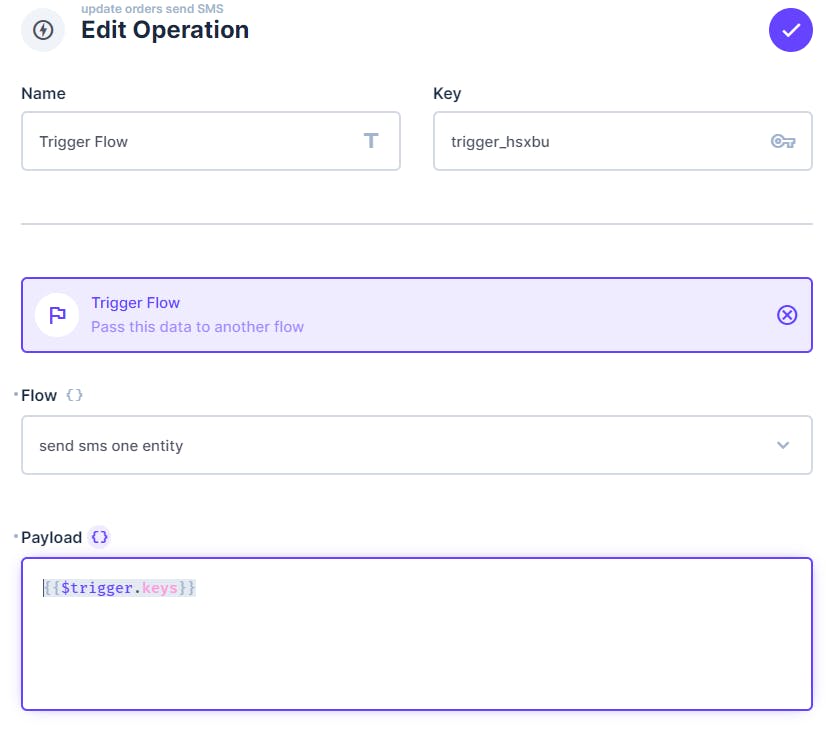
This is a very cool trick that will result in triggering the "send SMS one entity" flow once for every key in the trigger.keys array.
Testing the "send SMS" flow
At this point, I highly recommend you to make some tests. Create a new order, update an existing order and update multiple orders in one operation. Make sure that for each of these scenarios a log is received on the "send SMS one order" flow and a payload with one order key is present on the log.
Check if an SMS should be sent
What we accomplished so far:
We have two flows, one for the "create" event and one for the "update" event.
Both of the flows result in triggering the actual SMS flow with the ID of the order object.
To test if the SMS should be sent, we need to read the order object data and make a decision based on the values of its fields. So let's click on the ➕ button and add a Read Data operation and configure it to read from the "order" collection with ID {{$trigger}}. By that we will read the order object with the ID that the flow was triggered with:
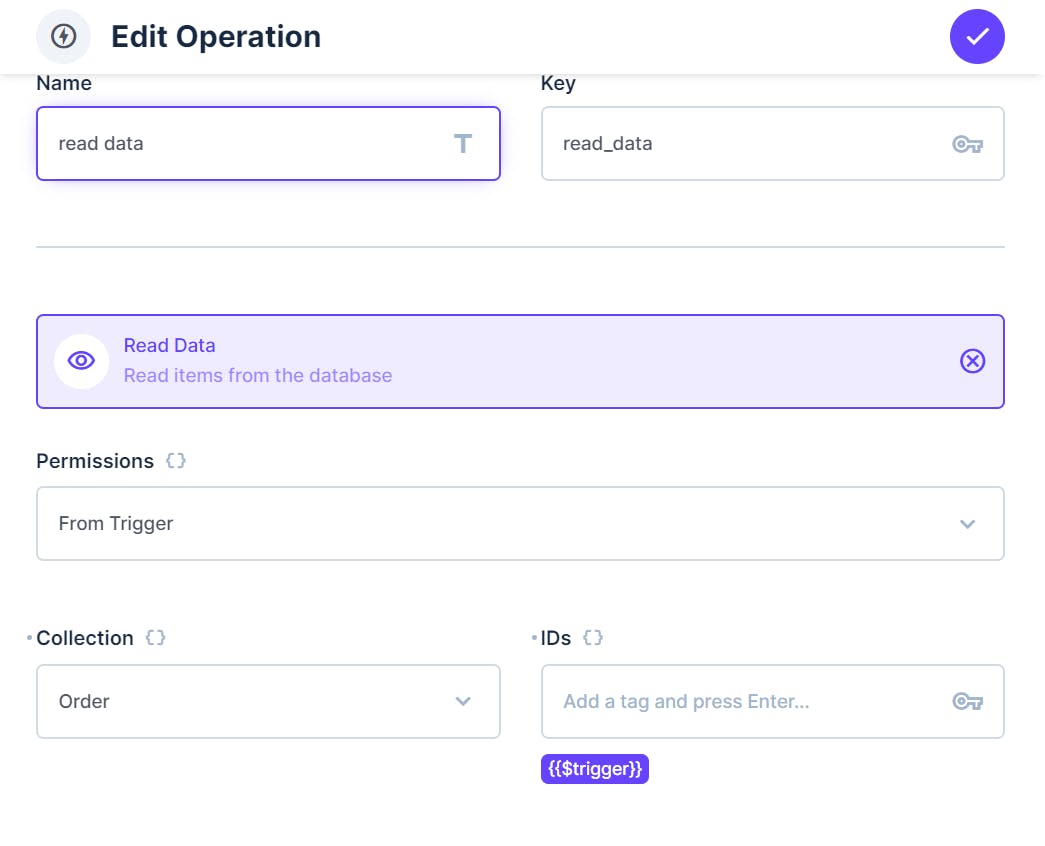
It's important to provide a key for this operation so we can reference it later in other operations (In my example the key is "read_data").
What we want to do now is check if the order object satisfies a certain condition. While Directus has a "Condition" flow built in, I find it quite difficult to make it work. One feature of it is quite nice, that you can direct true and false in different directions in your flow.
In our flow, we will create a script operation that will calculate our condition and connect it to a condition operation to direct the flow to where we want.
The script operation:
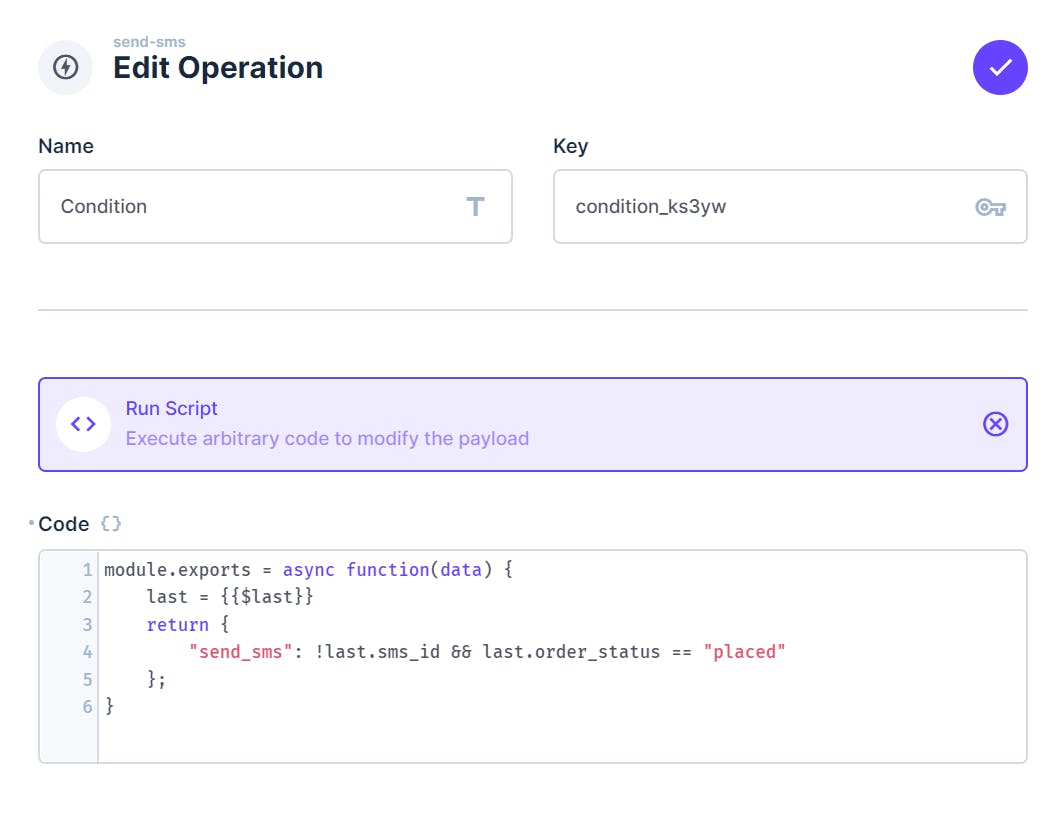
The script code:
module.exports = async function(data) {
    last = {{$last}}
    return {
        "send_sms": !last.sms_id && last.order_status == "placed"
    }
}
A few things to note here:
Notice the
${{last}}reference. This parameter holds the last operator output. In our case the reading order operation.First, we check that the SMS was not already sent (using the field
sms_idand also check the other conditions for whether to send the SMS or not.The return statement will pass the object it is given to the next operation.
Now let's go ahead and add the actual condition operation:
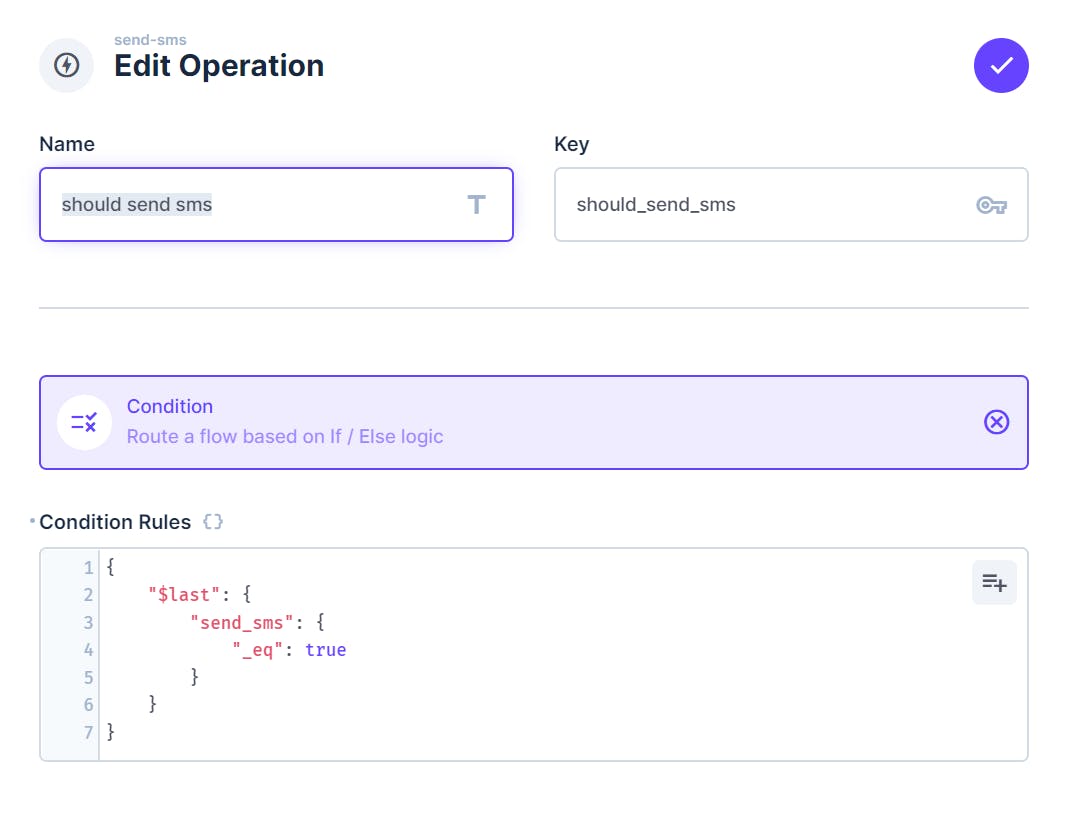
The condition rules:
{
    "$last": {
        "sems_sms": {
            "_eq": true
        }
    }
}
For more information on condition operators: https://docs.directus.io/configuration/flows/operations.html#condition and more specifically on the condition filter rules https://docs.directus.io/reference/filter-rules.html.
Testing
Again - I highly recommend that at the end of each step you should test the results of what you did. So go ahead, create an order with or without the required condition, update some orders and see the results.
Finally - Send the SMS
We are at the final step! Congrats!
Twilio SMS API works by making a POST request to a certain URI with the request details in the body of the form application/x-www-form-urlencoded (More on that here https://developer.mozilla.org/en-US/docs/Web/HTTP/Methods/POST). The easiest way to construct the body will be with javascript code. Create a new custom script operation with the following code:
module.exports = async function(data) {
    order_data = {{read_data}} // Read data from the operation with the key "read_data"
    from = encodeURIComponent("PHONE_NUMBER/Alphanumeric_Sender_ID") // This should be a registered phone number on your account.
    to = encodeURIComponent("PHONE_NUMBER") // phone number to send to. This can be generated from some information on the order object
    body = encodeURIComponent(`Hey! The order amount is ${order.amount}`) // Any message you like, including some data from the order object
    return {
        data: `From=${from}&To=${to}&Body=${body}`
    }
}
This will construct all the elements needed to send the SMS on Twilio. You can read more about the different options for Twilio SMS API in their documentation, but the basic idea will remain the same.
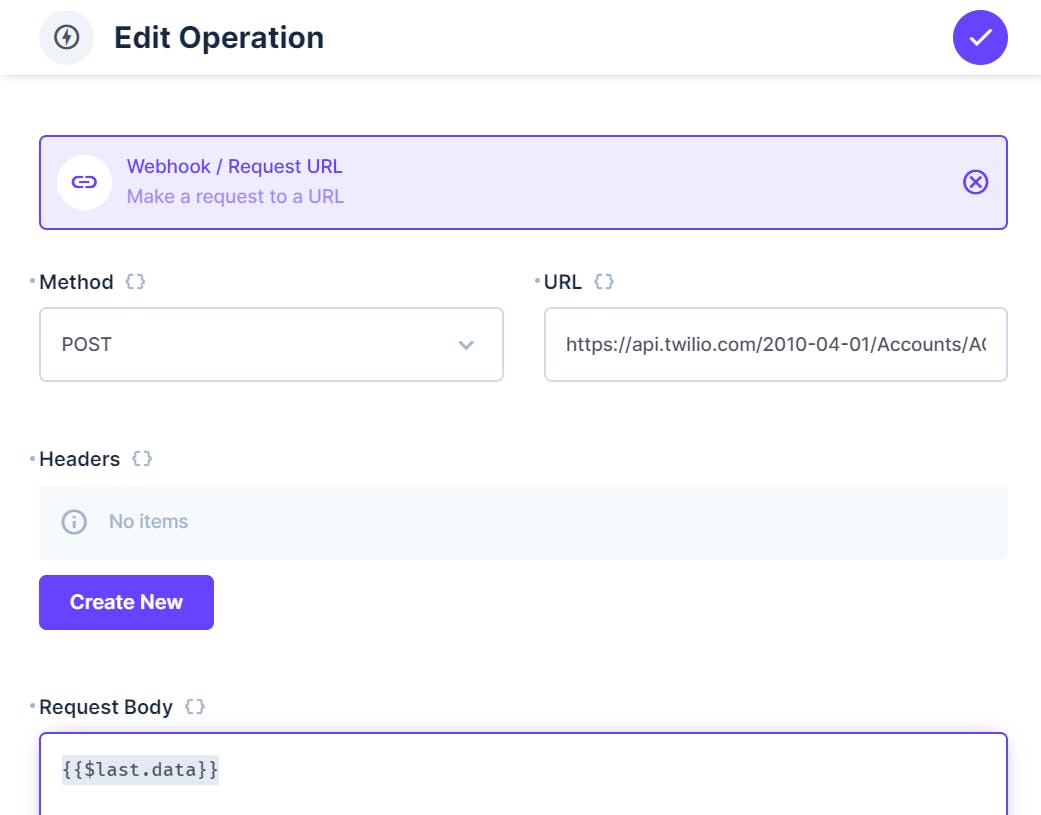
Now we are ready to create the request operation. Create an operation with the type "Webhook / Request URL". For the method choose "POST". URL should be in the format https://api.twilio.com/2010-04-01/Accounts/{TWILIO_ACCOUNT_ID}/Messages.json and replacing {TWILIO_ACCOUNT_ID} with your Twilio account ID (You can find yours on the account details page on the Twilio console).
On the "Request Body" put the value {{$last.data}} so we will use the previous operation result.
Adding authorization header
Now we need to add a new header to the request with the authentication details.
First, we need to create a Base64 encoded value for the authentication. Go to https://www.base64encode.org/ and for value put ACCOUNT_ID:ACCOUNT_AUTH_TOKEN (Replace ACCOUNT_ID and ACCOUNT_AUTH_TOKEN with the values for your account. Access those under "Account -> Auth tokens & API keys" menu on the Twilio console).
Now click encode and copy the encoded text.
For that click on the "Create New" button under the "Headers" section. For "Header" put "Authorization" and for value put Basic ENCODED_TEXT and replace ENCODED_TEXT with the value you copied in the previous step.
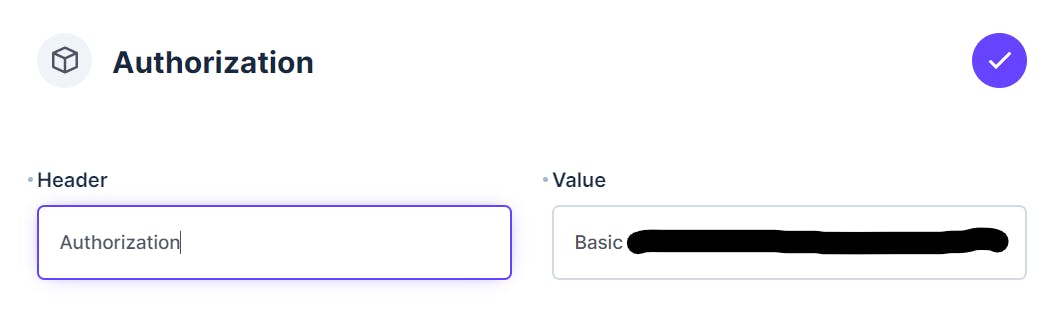
Save the header. And lastly, save the operation.
Time for testing!
Let's try to generate an update/create operation that will send an SMS to our phone.
Finishing up
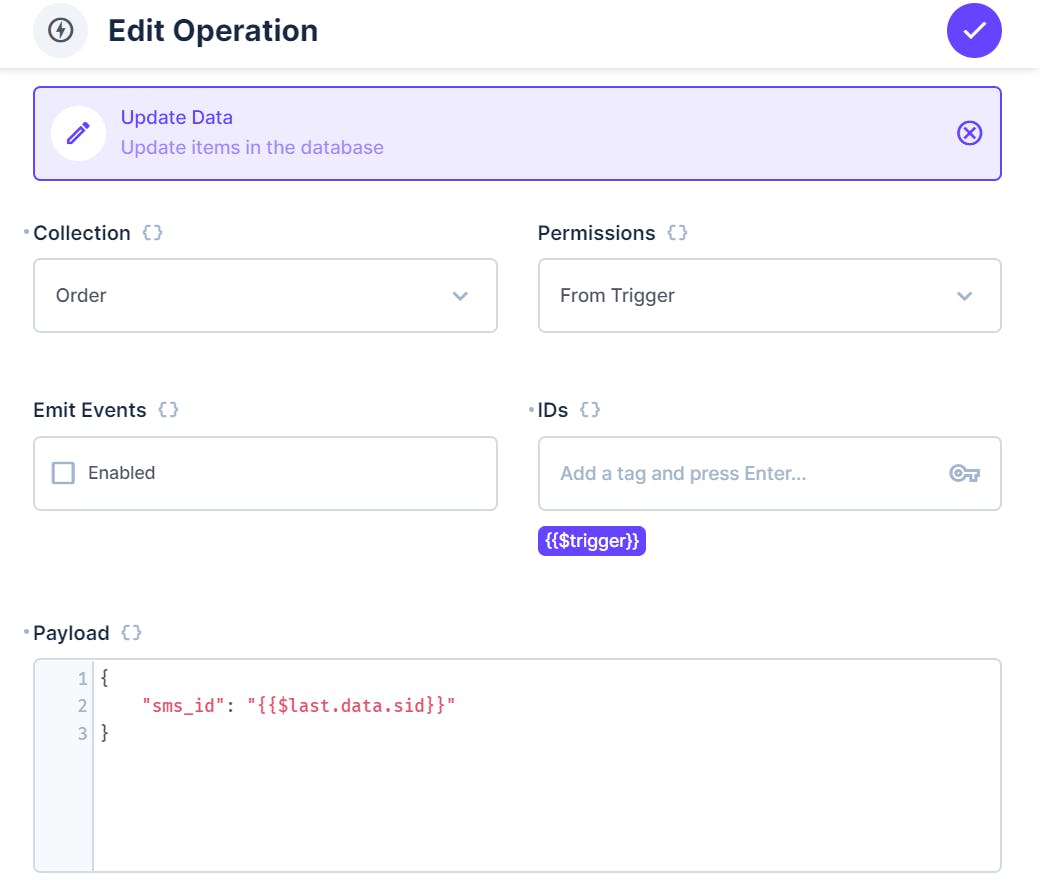
One last thing. We need to somehow make sure that once we send an SMS, we won't send another SMS on the same object. Other than that, after we send an SMS it would be great to save the Twilio sms_id on the object, so we can debug and investigate issues if needed. Let's take a look at the last testing cycle we did and see what was the result of the request operation. It will look something like this:

So we can use the response we get from Twilio to update our orders object with the sid (which is the SMS id).
Let's add an "Update Data" operation. We will use the ID of the trigger to identify the object to update, and use the response data to update sms_id field with the ID of the sms that was sent:
And We Are DONE!
And that is it! Now we have a full flow that support both update and create events and sends a Twilio SMS with the order details.
It might seems like a lot to take in and a lot to handle, but once you get the hang of it and knows the tricks and how to avoid the pitfalls of Directus flow, it is actually quite cool and opens up a lot of different possibilities.
Hope you enjoyed it :)